विवरण
Connecting EngageBay account
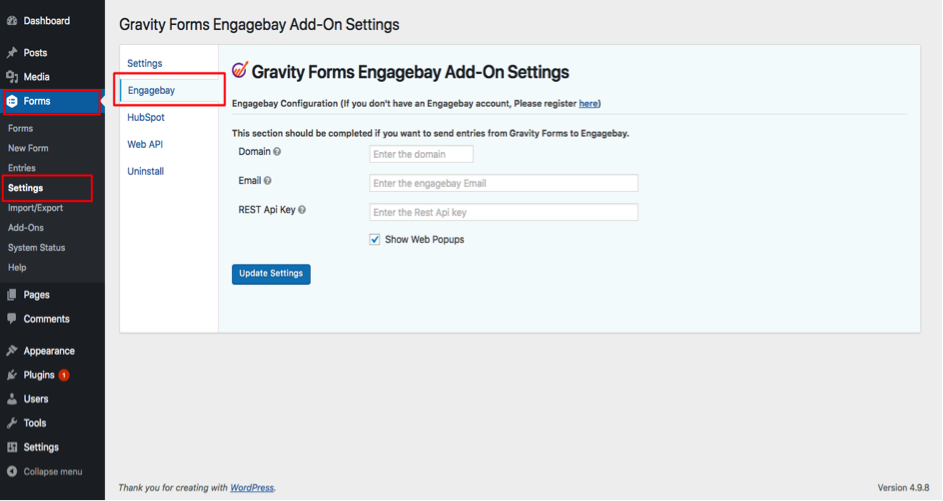
Enter the Engagebay Domain, Email and REST API Key (Admin Settings->API and then copy REST API Key). If you want to enable Web Popups for your site, Check/Uncheck Show Web Popups.
Map EngageBay fields with Gravity Form fields
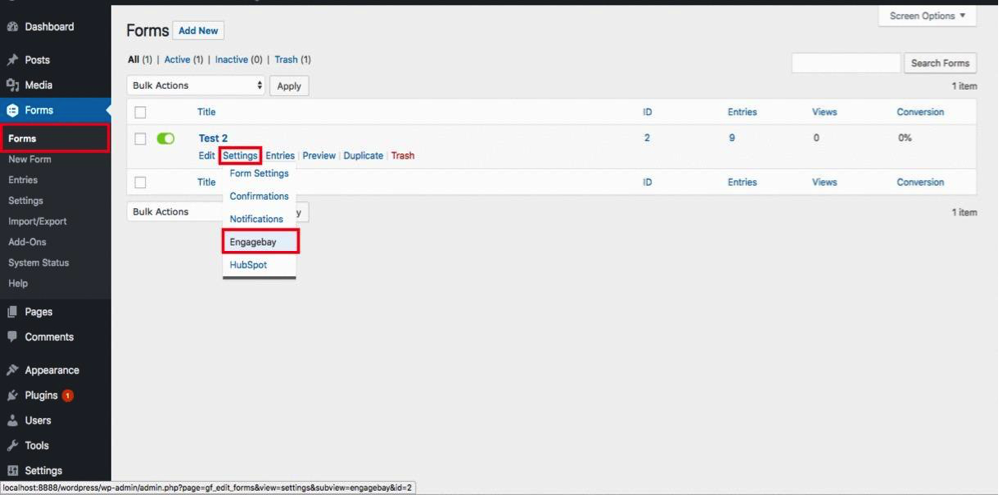
In the Form Settings tab, choose the Gravity Form that you’d like to integrate with EngageBay. Map the Gravity Form fields to the EngageBay fields (email, contacts, company etc). After mapping all the fields, save the details.
EngageBay system is simple and refreshing.
Melinda – WordPress Consultant
Here’s why smart business owners, designers, and developers love EngageBay, and you will too!
How EngageBay Can Help Your Business Grow
- All-in-one CRM, Marketing, Sales and Support software
- Increase web visitor engagement
- Capture more leads
- Grow email lists
- Convert more subscribers and sales
- Increase trust and brand value of your business
Support
Check out our support page for help documentation and access other support channels or simply send us an email to support@engagebay.com.
स्थापना
1) Install the EngageBay Forms plugin
Login to your WordPress admin panel, go to the ‘Plugins’ menu and click on ‘Add New’.
-
Search for ‘EngageBay for Gravity forms’ in the WordPress plugin repository and click ‘Install Now’. Activate the plugin after installation. After activation, you will see the ‘EngageBay’ tab on your main menu.
-
Download the EngageBay Gravity forms WordPress plugin from our website. Click ‘Upload Plugin’ to upload the plugin zip file and click ‘Install Now’. Activate the plugin after installation. After activation, you will see the ‘EngageBay’ tab on your main menu.
2) Create or set up EngageBay account
Click on the ‘EngageBay’ tab and navigate to ‘Settings’. Create a new EngageBay account if you don’t have one.
3) Connect EngageBay account
Enter the Engagebay Domain, Email and REST API Key (Admin Settings->API and then copy REST API Key). If you want to enable Web Popups for your site, Check/Uncheck Show Web Popups.
4) Map EngageBay fields with Gravity Form fields
In the Form Settings tab, choose the Gravity Form that you’d like to integrate with EngageBay. Map the Gravity Form fields to the EngageBay fields (email, contacts, company etc). After mapping all the fields, save the details.
5) Tag the forms
Enter the Tag name for the form and if you want multiple tag names, you can enter tag names separated with a comma and then click on Save Mapping.
6) Add forms and test
Go to Pages in the sidebar and edit any one of the pages, select add form (select the form which you have integrated with EngageBay) in the editor and update the page.
-
Visit the site with the page edited above, fill the fields, submit the form and check if the Contact is added in the EngageBay along with the Tags.
-
Also, when the page is visited, you can see the Web Popups are displayed as per the settings provided.
प्रश्नोत्तर
-
What is EngageBay and what makes it unique?
-
EngageBay is an affordable, all-in-one CRM, marketing, sales and support software for growing companies. Learn more from here
-
Can I use the plugin for free?
-
Yes! You can use this plugin for FREE. You can get a free EngageBay account to store your form entries.
-
How to integrate EngageBay with Gravity Forms
-
Just install this free EngageBay Gravity Forms plugin, Connect your EngageBay account following the installation instructions and map Gravity Forms fields to EngageBay fields.
-
Where can I get support?
-
Please visit out our support page for help documentation and access other support channels or simply send us an email to support@engagebay.com.
समीक्षाहरू
यस प्लगिनको लागि कुनै समीक्षाहरू छैनन्।
योगदानकर्ता र डेभलपरहरू
“EngageBay for Gravity Forms” खुला स्रोत सफ्टवेयर हो। निम्न व्यक्तिहरूले यो प्लगिनमा योगदान गरेका छन्।
योगदानकर्ताहरू“EngageBay for Gravity Forms” लाई आफ्नो भाषामा अनुवाद गर्नुहोस्
विकासमा रुचि छ?
आरएसएस द्वारा कोड ब्राउज गर्नुहोस्, एसभीएन रिपजिटरी हेर्नुहोस्, वा विकास लग को सदस्यता लिनुहोस्।
चेन्जलग
- Fixed Sync issue for dates, checkboxes and tags


